How to Clean Your Swimming Pool Pump
A pool pump is the heart of your circulation system. When it is clean, the pool skims properly, the filter works efficiently, and chemicals spread evenly. When it is dirty or partially blocked, you get weak suction, poor return flow, noisy operation, air bubbles, and a pool that struggles to stay clear. Cleaning a pool pump is not complicated, but it must be done safely and in the right order so you do not damage seals, lids, or electrical parts.
This guide covers exactly what to clean, how to do it step by step, and how to spot problems early.
What you are actually cleaning on a pool pump

When people say they are cleaning the pump, they usually mean three areas.
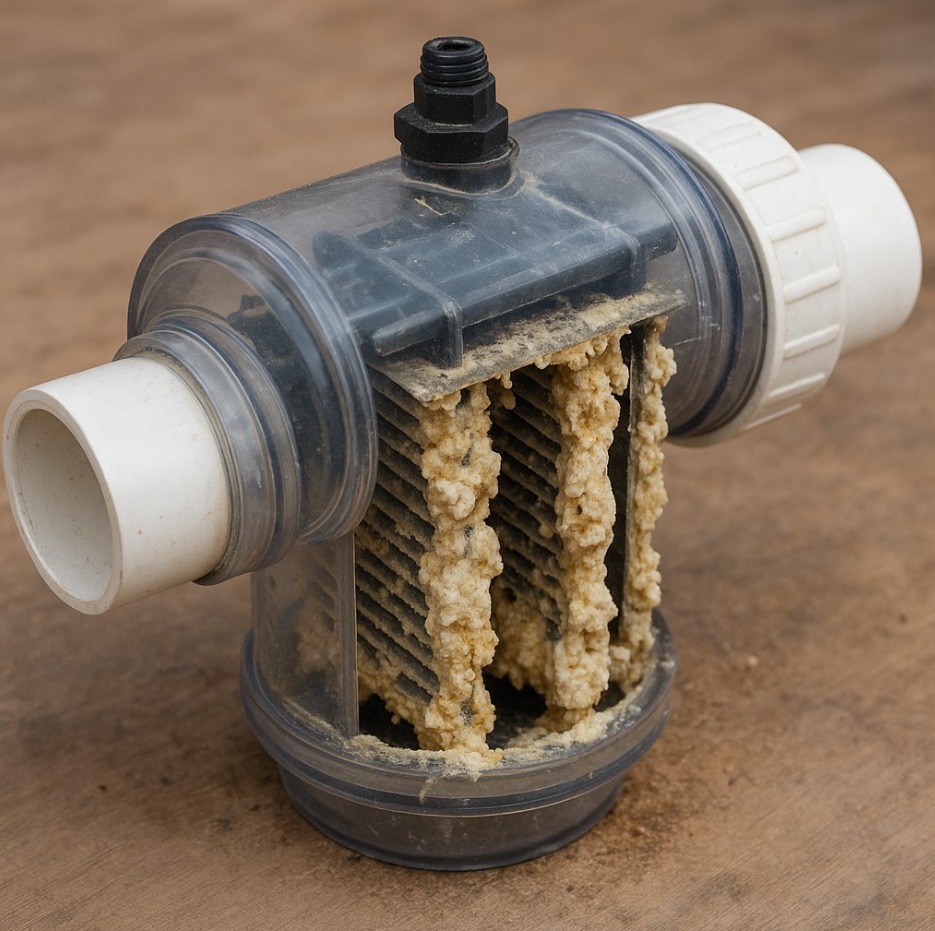
The pump strainer basket and housing, which catches leaves and debris before they reach the impeller.
The pump lid and O ring seal, which keeps air out and maintains prime.
The impeller area, which can clog with hair, grit, or small debris and reduce flow.
If you clean these areas properly, most flow problems improve immediately.
What you need to clean a pool pump
A pair of gloves
A towel or cloth
A small bucket for debris and dirty water
A garden hose or a jug of clean water
A so brush or old toothbrush
Silicone based lubricant for the lid O ring
A screwdriver for opening pump lids or impeller access panels if your model has them
A flashlight to inspect the housing and impeller area
A skimmer sock or basket insert, optional but helpful for preventing future clogs
Step by step How to clean your swimming pool pump
Step 1 Switch off power safely
Turn the pump off at the timer and switch it off at the breaker if possible. This prevents accidental start up while your hands are inside the pump basket area. Pool pumps are powerful and you want zero risk here.
Step 2 Close isola on valves if you have them
If there are valves on the suction and return lines near the pump, close them. This reduces water loss and makes the cleaning process cleaner. If you do not have valves, you can still proceed. Just expect water to drain when you open the pump lid.
Step 3 Release pressure from the system
If your filter has an air relief valve, open it. This helps reduce pressure and makes the system safer. It also helps when you restart because trapped air can escape more easily.
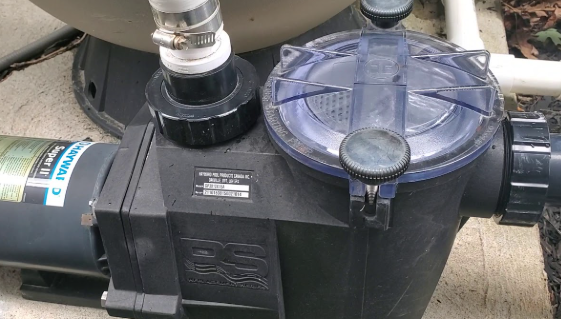
Step 4 Remove the pump lid carefully
Unlock the lid clamps or twist the lid off depending on your pump design. If the lid is stuck, do not force it with excessive leverage. Wiggle it gently and check that the pump is fully off and pressure is relieved.
Set the lid aside on a clean surface.
Step 5 Remove and clean the pump basket
Lift out the strainer basket. Empty leaves, sand, and debris into a bucket or bin. Rinse the basket with a hose. If the basket has oily residue, scrub lightly with a brush and rinse again.
Look at the basket closely. Cracks or missing sections allow debris to reach the impeller, which creates more serious blockages.
Step 6 Clean the pump housing
With the basket removed, look inside the pump housing. Remove any leaves, twigs, or clumps of debris by hand. Rinse the housing with a small amount of clean water and wipe grime from the surfaces. Keep dirt away from the lid sealing surface.
Use a flashlight to inspect the area leading toward the impeller opening. If you see packed debris, that is your next focus.
Step 7 Check and clear the impeller area
The impeller is the rotating part inside the pump that moves water. If it is clogged, your pump can sound normal but circula on will be weak.
With the pump off, reach into the opening behind the basket area and feel for debris. You may find hair, small stones, seed pods, or plastic bits. Pull them out gently.
Do not use metal tools aggressively. The goal is to remove debris without damaging internal components.
If your pump has an impeller access port, use it according to your pump manual. If you cannot access the impeller safely, stop and consider calling a technician, especially if you suspect something is jammed.
Step 8 Clean and lubricate the lid O ring
This is a high impact step many people ignore. The O ring is what makes the lid airtight. If it is dirty, dry, or cracked, the pump can suck air, lose prime, and fill the system with bubbles.
Remove the O ring if possible. Wipe it clean. Wipe the groove where it sits. Apply a thin layer of silicone lubricant and reinstall it neatly.
If the O ring is flattened, cracked, or stretched, replace it. A worn seal is one of the most common causes of air leaks.
Step 9 Reassemble and prime the pump
Put the basket back in. Fill the pump housing with water using a hose or jug. This helps the pump prime quickly and reduces strain during startup.
Reinstall the lid and lock it firmly.
Open any valves you closed.
Step 10 Restart and bleed air
Turn the pump on. Watch the pump lid. You should see water fill the basket area with minimal bubbles. If the filter has an air relief valve, keep it open until a steady stream of water comes out, then close it.
Check return jets for strong flow. Check for leaks around the lid.
Step 11 Record your normal opera ng pressure
After the system stabilizes, look at the filter pressure gauge and record the normal reading. This helps you diagnose problems later because you will know what normal looks like.
Signs your pump needs cleaning again
The pump basket fills with debris quickly
Suc on at the skimmer is weak
Return jets feel weak even a er backwashing or cleaning filters
Air bubbles appear in the pump lid or at the return jets
The pump sounds louder than usual or changes tone
The pump loses prime after startup
These symptoms usually point to a dirty basket, a clogged impeller, or an air leak at the lid seal.
Common mistakes to avoid
Do not open the pump lid while the pump is running.
Do not run the pump without the basket installed.
Do not use petroleum grease on O rings, use silicone lubricant.
Do not ignore repeated air bubbles, they usually mean an air leak.
Do not keep forcing the pump to run if it will not prime, investigate the cause first.
Simple preven on that saves you hours
Empty skimmer baskets regularly. This reduces what reaches the pump.
Use a skimmer sock during windy days or algae cleanup to catch fine debris early.
Backwash or clean filters on me so the pump is not fighting high resistance.
Keep the pump lid O ring clean and lubricated so air cannot enter.
Keep the water level high enough that the skimmer does not pull air.
Final thoughts
Cleaning your pool pump is mostly about keeping the basket area clear, making sure the lid seal is airtight, and ensuring the impeller is not blocked. If you clean those areas regularly, your circulation improves immediately, your filter works better, and the pool becomes easier to keep clear.
Troubleshooting your swimming pool pump
Problem 1 The pump will not prime or it keeps losing prime
This usually means the pump is pulling in air or it cannot pull enough water to stay full.
Check the water level first. If water is below the middle of the skimmer opening, the skimmer can suck air and the pump will struggle to prime.
Check the pump lid and O ring. A dry, dirty, flattened, or cracked O ring is one of the most common causes of air leaks. Clean it, lubricate it with silicone lubricant, and make sure the lid is seated evenly and locked tight.
Check the drain plugs on the pump housing. Many pumps have one or two drain plugs. If a plug is loose or the gasket is missing, air can enter or water can leak out and the pump may not hold prime.
Check the pump basket. If it is not seated properly or the basket is cracked, it can disrupt flow and contribute to priming issues.
Check suction side valves and unions. If any suction valve is partially closed or a union is loose, the pump may pull air. Tighten unions by hand and ensure valves are fully open.
Prime the pump properly. Fill the pump housing completely with water, close the lid, then start the pump. If the filter has an air relief valve, open it until water flows steadily.
Problem 2 Air bubbles in the pump lid or bubbles coming out the return jets
Small bubbles often point to air being pulled in on the suc on side of the system.
Inspect the pump lid seal again. Even a small gap or a dry O ring can pull air without dripping water.
Inspect the skimmer lid and skimmer weir. A stuck weir door or a low water level can cause a vortex that pulls air.
Check the suction pipe connections and unions. A tiny leak can pull air in without showing water leakage because the suction line is under negative pressure when running.
If bubbles increase when you use a manual vacuum hose, the hose connection may be drawing air. Ensure the hose is filled with water before connecting.
Problem 3 Weak suction at the skimmer and weak return flow
This can be a restric on on the suction side, a clogged impeller, or high resistance on the return side.
Clean the skimmer basket and pump basket first. Even partial blockage reduces flow quickly.
Check the impeller for clogs. Hair, grit, and small debris can pack inside the impeller throat. Clear it gently from the basket opening area.
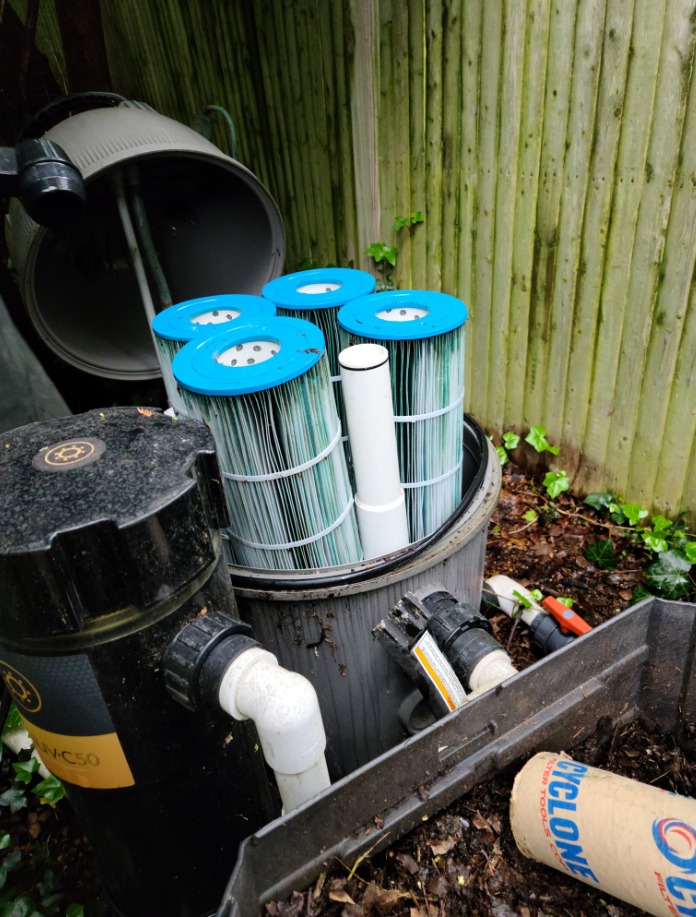
Check the filter pressure gauge. If the pressure is high, the filter is restricting flow. Backwash the sand or DE filter, or clean the cartridge filter.
If pressure is normal but flow is weak, look for a blockage in the suction line or a partially closed valve.
Problem 4 The pump is loud, whining, or making a grinding sound
Noise can come from air in the system, a blocked impeller, or worn bearings.
If the pump is sucking air, it can sound like it is surging or rattling with bubbles in the lid. Fix air leaks and prime properly.
If debris is stuck in the impeller, the pump may sound strained and flow will be low. Clear the impeller.
If the sound is a consistent high pitched whine or grinding and it does not change after cleaning and priming, the motor bearings may be worn. In that case, the pump may need servicing or replacement.
Problem 5 Pump starts then stops or trips the breaker
This can be electrical, overhea ng, or mechanical strain.
Check that the pump is not running dry. A pump without water can overheat and trip protection.
Check for a jammed impeller. A jam can overload the motor and trip the breaker.
If the breaker trips immediately even when the pump basket is full of water and the impeller is clear, you may have a capacitor, wiring, or motor issue. For safety, do not keep reseting the breaker repeatedly. It is better to have an electrician or pool technician check it.
Problem 6 Water leaks around the pump lid
Leaks usually come from lid seating or the O ring.
Clean the lid and the sealing surface. Even grit can stop a proper seal.
Lubricate the O ring lightly with silicone lubricant and ensure it is not twisted.
If the O ring is flattened, stretched, or cracked, replace it.
Problem 7 Pump primes but performance drops after a short me
This can happen when the pump basket fills with debris again, when the filter loads quickly, or when there is a suc on restriction that worsens as the system runs.
Check baskets again and remove debris.
Watch the pressure gauge. If it climbs quickly, the filter is clogging and needs cleaning more frequently during dusty or algae conditions.
If the pressure stays normal but flow drops, suspect a suc on line restriction or intermittent air leak that worsens as water level changes.
Quick diagnostic map
Bubbles in pump lid usually means suc on side air leak
High filter pressure usually means dirty filter restricting flow
Low pressure with weak flow o en means suction restriction or air leak
Strong pressure rise after vacuuming usually means filter loading fast
Pump will not prime usually means air leak, low water level, or suction restriction
FAQs
1. How much water loss is normal for a pool?
About 1/4 to 1/2 inch per day from evaporation is normal in warm weather.
2. Can small leaks cause big damage?
Yes. Even a small leak can cause soil erosion, deck damage, and equipment strain over time.
3. How long does leak repair take?
Minor repairs can take a few hours. Major repairs may take several days.
4. Will insurance cover pool leak repairs?
5. How often should I check for leaks?
Get in touch for expert pool care

Need help? we are always here to assist you with expert care
Need Help
+27 10 065 1995
E-mail us
info@poolquest.co.za